The First Layer – The Cross
 For the second lesson, the first and arguably most difficult part of the solving method will be covered. It is advised that a lot of time is spent on making sure students understand this stage entirely, as the inability to solve this stage could cause motivational issues. It is also important to stress that this stage is one of the most difficult in the cube for a beginner solver. It will take some time for the students to understand the process, and the presentation has been put together in a way that details the stage as best as possible with many images and animations provided to help the understanding of the students.
The cubes do not need to be solved for the remainder of this course, they may remain scrambled and be distributed randomly.
Recap
To start the lesson, a quick 5 question recap is provided to ensure the students remember the notation of the cube. From this point onwards, knowledge of the basic notation explained in the first lesson will be assumed. The questions are fairly simple, although there are a couple that require more explanation.
Introduction to the Cross
The Cross's name and purpose are explained in the presentation and the difficulty of the stage is mentioned. The student is then invited to choose a cross colour. Although any colour will work for a cross, white is very strongly suggested and only those who have prior cube knowledge/solving experience should attempt a different colour from the start, as the colour positions are heavily relied on in the guide. Advise students to use white for now and, once they have a good grasp of at least the cross if not more students, encourage them to consider other colours or use multiple cross colours based on which is easiest to construct.
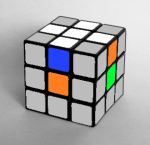
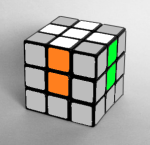
The end state of the cross stage is shown to highlight the position of each piece.
The First Edge
This stage explains how to insert the first edge into the correct position. This stage should not require any more than two moves (counting a half-turn as one move). This is fairly basic and it is assumed that most students will be able to do complete this step without issue, so there will be others in the class available to help those who don't understand.
After this, the first of two algorithms is introduced. This is only 4 moves, however students may need to refer back to the previous presentation if they have forgotten the notation, as this algorithm is very important in solving this stage.
Animations are provided showing the algorithm being performed to assist visual learners and to help clarify the notation further.
The Second Edge
This stage explains how to insert the second edge into the correct position, however in this stage students are introduced to the importance of maintaining their progress by not making moves that will disturb the solved edge. A slightly different approach is taken for the next few edges to help show this. The first algorithm is repeated and shown again, this time emphasizing the way it is designed to ensure that none of what the student has already made will be ruined.
After this, the second algorithm is introduced and another animation is shown. These both show a simple algorithm that tackles a problem that could seem quite complicated to students.
Examples of the third and fourth edges being solved are given with several small animations. These are used to provide a visual idea of what the algorithms and separate stages are doing to the cube and how the end result is achieved.
Finally, students are congratulated on completing one of the most complicated and confusing stages of the cube, and ensures them that the next stages are easier.
Resources
Read more about the solution of the first layer edges of the Rubik's Cube.
Try the online Rubik's Cube solver program that calculates the optimal solution in 20 steps.
 Download The PowerPoint Presentations from Google Drive