Rubik’s UFO Solution
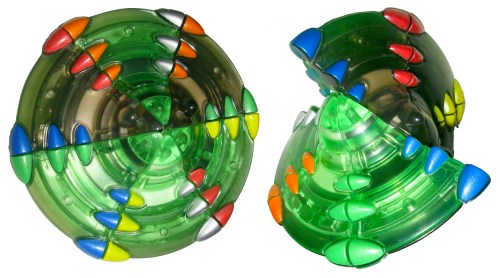
The Rubik’s UFO is an interesting puzzle that has similar properties to a Square-1. The puzzle was originally sold by Rubik’s however is now more difficult to find. There are two main version of the puzzle, one with black and green transparent faces and another with grey and lighter grey, although the grey version is rarer and often more expensive to buy.
The UFO can be solved using a step-by-step solution and only one algorithm plus the parity algorithm, making it fairly simple to solve for those with twisty puzzle experience and only slightly harder for those with none.
Notation
Although there is only one algorithm required to solve this puzzle without parity, the notation will still need to be covered for when it is required in intuitive section explanations.
The sections of the puzzle will be referred to as follows:
- Sectors – Each 1/6th sector of the top or bottom face.
- Ridges – The 3 coloured lumps that connect two sectors
- Half-Ridges – When two sectors are split, the ridges are also split directly down the middle. This means that 3 half-ridges of one colour will be matched with 3 half-ridges of another colour.
- Faces – There are two faces on the puzzle, each with 6 sectors.
The puzzle has two “faces”, the top and bottom. These faces can slide across each other like any other puzzle. If you want to compare it to something, think of a 2x2 cube – The top and bottom faces can be moved independently of one another. On a 2x2, there are only 4 pieces on the top layer, so moving the top layer 90 degrees four times in the same direction will put you back where you started. The Rubik’s UFO works in a similar way, however there are six “slices” on each face. Performing six U moves on the Rubik’s UFO will return it to its original state. Below is shown what would happen upon performing a single U move on a Rubik’s UFO and how the six sectors on the top face would rotate.
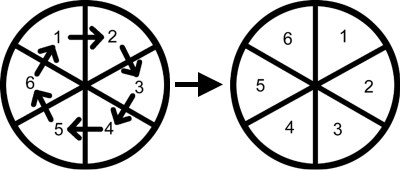
U – A single rotation of the top face in the clockwise direction.
U’ – A single rotation of the top face in the counter-clockwise direction (the opposite of a U move).
U2 – Two rotations of the top face in the clockwise direction.
U4 – Four rotation of the top face in the clockwise direction.
The puzzle, in this orientation, can be turned vertically. This is the equivalent of an R move on an NxN cube and also a slash (/) move on a Square-1 (hence the similarity).
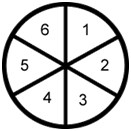
In this diagram, the top circle represents the top face and the bottom circle represents the bottom face. The faces join together so that sector 1 is directly above sector 1’, and so on.
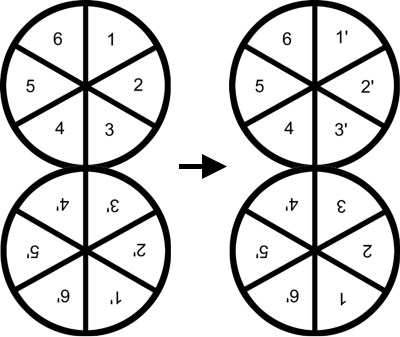
/ - A 180 degree vertical move of the three right-most sectors on the puzzle. This swaps the three sectors on the right half of the top face with the three sectors on the right side of the bottom face.
You also may need to rotate the entire puzzle by one sector if you have parity. The diagram shows what this rotation looks like.
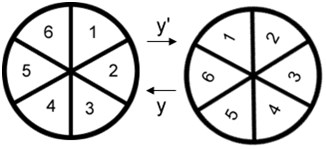
y’ – A physical rotation of the puzzle which moves each sector counter-clockwise by 1 (on the diagram, image 1 à image 2).
y – A physical rotation of the puzzle which moves each sector clockwise by 1 (on the diagram, image 2 à image 1)
These are the only parts of notation that you need to know to understand how to solve the Rubik’s UFO.
Solution
The solution for the Rubik’s UFO will be broken down into the following steps –
- Solving the first face and its ridges in one step
- Solving 3 adjacent sectors
- Check for parity
- Solve last 3 sectors and fix parity if present
Solving the first face and its ridges
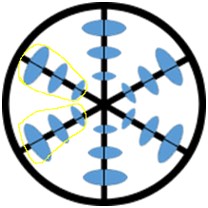 To solve the first face you need to first match three same-coloured sectors (green/black or grey/light grey) and ensure that the ridges also match. To make sure that these three matching sectors are correct, you should see the following:
- 3 adjacent sectors all having the same base colour (green/black)
- The 2 highlighted ridges on the image adjacent should be matching.
If you’re having difficulty with the matching ridges, think of a 3x3’s cross pieces. If these two ridges don’t match, then the sectors do not belong next to each other (for example the red and green cross pieces were switched).
Once you have three correctly matched sectors, hold the puzzle so that they are in the bottom left of the puzzle (using the second diagram in the notation section, in positions 4’ 5’ and 6’). Finishing the bottom face should be fairly simple, as you can use a combination of / and U moves to match the remaining three sectors and place them on the bottom layer with the three you already have solved.
Solving three adjacent sectors
To solve three adjacent sectors, you must first match up two sectors. If two sectors are correctly matched up, there will be a solved ridge connecting them, so look for a solved ridge on the top layer. If there are none, don’t worry, just do the algorithm below from any angle once or twice to get a solved ridge.
 Keep track of the two sectors that are solved. The algorithm below will cycle three sectors. The three sectors that will be cycled in the adjacent image are:
- 2 -> 3
- 3 -> 4
- 4 -> 2
This means that you must ensure your solved ridge is either between sectors 1 and 6 or between sectors 5 and 6 when you perform the algorithm. Try and perform the algorithm so that the cycle creates a second ridge adjacent to the one you already have solved. Two adjacent solved ridges represent three adjacent solved sectors, just like when you were making the first face.
The algorithm is as follows:
/ U’ / U2’ / U’ / U2’ / U’ / U2’ / U’ / U2
If performing this algorithm does not solve a second ridge, try it again. If this doesn’t work, try changing the position of the two sectors you already have solved (if they’re in positions 5 and 6, try putting them in positions 6 and 1), and try it again. Eventually, you should have two solved adjacent ridges and, therefore, three adjacent solved sectors.
Parity Checking
It is at this point of the solve where any parity you may have becomes obvious. Move the three solved sectors you just joined together into positon 4, 5 and 6 (the 3 leftmost positions on the top face). You can now tell if you have parity by going through the following process:
- If there is a fourth correctly solved piece attached to the 3 solved sectors you built earlier (i.e. either the ridge between sectors 6 and 1 is solved OR the ridge between sectors 4 and 3 is solved), then you have parity.
- If the above is not true, then check to see if the ridge between sectors 1 and 2 is solved OR if the ridge between sectors 2 and 3 is solved. If neither of them are solved OR both of them are solved, you have parity.
- If neither of the above is true, then you don’t have parity
Solving last three centres WITHOUT parity
If you do not have parity, then the last 3 sectors can simply be solved using the same algorithm as before. Make sure you put your three solved sectors in positions 5, 6 and 1 before you start to preserve them, and perform the algorithm until the puzzle is solved.
Solving last three centres WITH parity
To solve the last three centres when you have parity, you need to apply an additional algorithm which swaps two adjacent sectors and ultimately solves the puzzle.
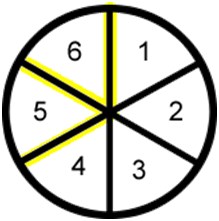 To get into the state ready to perform parity, you need to first ensure that you have four solved sectors. If you have only 3 solved sectors (the 3 you built in the first stage of the top layer) and you know you have parity from the above checks, position your three solved sectors in positions 5, 6 and 1 and perform the above algorithm until you have 3 adjacent ridges solved and 3 adjacent ridges unsolved (this proves that you have parity). Now look at your solved ridges. Place the ridges in positions 4-5, 5-6 and 6-1 (4-5 = there is a solved ridge between sector 2 and sector 3). Using the adjacent image, there should be a solved ridge in highlighted positions.
Next, perform the following algorithm which will swap sectors 2 and 3, completing the puzzle:
(/ U / y’ / y U2 / y’ / y U) x5
This algorithm is fairly lenghty, but it’s the easiest way of swapping 2 adjacent sectors without disturbing the already solved bottom layer.
After all of these steps and parity correction, your puzzle should be solved.