NxNxN Big Cube Puzzles
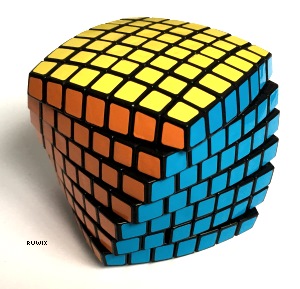
Since the release of the original Rubik’s Cube, people have been striving to create new and harder twisty puzzles. Some have changed the shape completely from a cube to a cuboid (and various other shapes), some have only seen simple sticker modifications. However, the most common of these upgraded Rubik’s Cubes is as simple as it sounds: like the 3x3, but bigger. The original puzzle has been expanded outwards to create bigger and more challenging alternatives: the 4x4, 5x5, 6x6 and 7x7. These puzzles may appear fairly complex and increasingly difficult as the number of layers increases, however their solutions remain relatively similar. Once you know the reduction method for the 4x4 and 5x5, you are technically able to solve any NxN puzzle given enough time.
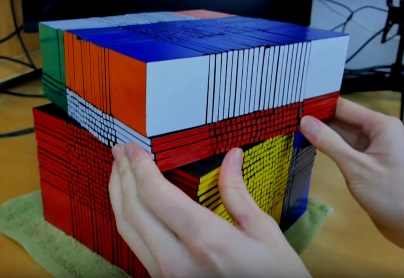
If you can solve the 4x4x4 and the 5x5x5 cubes then you can complete any size, even the 22x22x22 cube or the record-breaking 33x33x33!
Reduction Method Overview
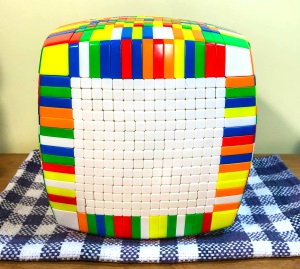
Grouping the white centers on a 17x17x17
The main method used to solve larger order NxN cubes is called “Reduction”, or “Redux” for short. The method involves a few simple steps that are used to “reduce” the puzzle to the equivalent of a 3x3. A 3x3 has 1 edge piece per edge and 1 centre per face, whereas a 4x4 has 2 edge pieces that make up one “edge” and 4 centre pieces which make up one “centre”. Reduction involves solving all the edges (matching up the pieces from the same edge to make one solved “edge”) and the centres, then solving the cube like a 3x3 (all of the edge pieces have been “reduced” to a single edge, and all of the centres have been “reduced” to one solid colour per face).
For each step a walkthrough will be provided for the 4x4 and 5x5 cubes, as most even-layered and odd layered puzzles share the same properties (4x4 and 6x6, 5x5 and 7x7 etc.).
The steps and sub-steps required to solve a cube using the reduction method are as follows:
Centres
- Opposite centres – Solve the centres of two opposite faces by matching up all of the centre pieces of that colour.
- Two adjacent centres – Solve another two centres on the puzzle using the freedom of the 4 unsolved centres on the puzzle
- Last two centres – Use commutators and puzzle knowledge to solve one of the last two centres, leaving the last centre solved.
Edges
- First 8 edges – Temporarily disturbing the solved centres to match edge pieces and complete 8 edges, placing each solved edge on to the top and bottom layers of the cube
- Last 4 edges – After realigning the centres, use algorithmic combinations to complete the final 4 edges
3x3
- Cross – Build a cross like a normal 3x3
- F2L – Constructing the equivalent of the first two layers (for 4x4, this is technically the first 3 layers, but because the edges are treated as one single piece, F2L knowledge applies directly).
- OLL – Orienting all of the pieces on the last layer (remember, all edge pairs/triplets etc. are treated as on piece, so you can’t have one part of an edge oriented and another un-oriented unless you made a mistake earlier on)
- PLL – Permuting all of the pieces on the last layer to complete the puzzle.
Centres
4x4 – On a 4x4 puzzle, the centres are fairly simple to solve. The first step involves building two opposite centres; these are normally white and yellow as these are the top and bottom faces for most people who know how to solve a 3x3. The first centre can be made by connecting two pieces together (in fact, most of the time there will already be one of these 1x2 “bars” solved on your cube due to the limited amount of possible centre combinations). Try finding one (if not, simply build it by doing at most 2 moves), and then find another to insert next to it.
Next, you can put your now solved centres on the left and right of the puzzle and solve two more adjacent centres. Remember – Because you’re solving an even layered cube, this means that there is no single centre piece. Even though odd layered cubes have many centres, there is always one that is directly in the middle of them all. For 4x4 and above, this is not the case. This means that when building your centres on even layered cubes, you must build the centres according to the colour scheme (i.e. if the centre to the left of red with yellow on top must be blue), or the cube will not be solvable. You should be able to apply your knowledge from the first two centres to build two adjacent centres without disturbing your original two.
You should now be left with two unsolved adjacent centres. Every other centre should be solved. There are only a few different combinations for the last two centres. Two of which are shown here.
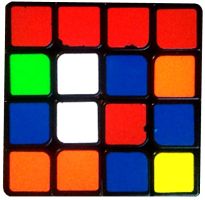
Single white bar
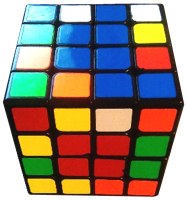
Two adjacent centres solved (the solved white centre on the left and yellow on the right)
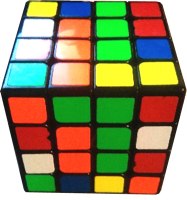
The Last 2 Centres stage - solved by Rw U2 Rw'
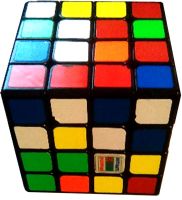
Two bars that can be connected with an Rw move to solve the white centre
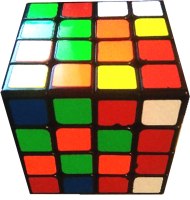
The Last 2 Centres stage - solved by Rw' F Rw F' Rw' F2 Rw
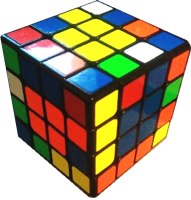
All centres have been solved
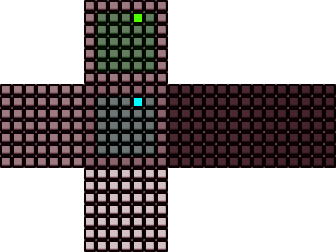
Use the algorithm below to swap the highlighted centre pieces on a 7x7x7 cube:
U' 3R' F' 2L F 3R F' 2L' F U
Click the image for animation
According to the notation of big cubes, the Rw refers to the wide rotation of the two right layers.
5x5 – On a 5x5 puzzle, the centres are only slightly more complicated than the 4x4. Because the 5x5 is an odd-layered puzzle, there is a single defined “centre” piece (even though all 9 of the middle pieces on each face are technically “centres”). To build your first centre, construct a bar by attaching two of the inner centres to the defined centre piece. Next, construct another bar of the same colour, but make sure that this one has two corner centres and one inner centre. Finally, build a third bar with the remaining 3 centres and insert it next to the first two. The second centre will be opposite the first, so the only difference in solving is that you have to undo certain moves to preserve the first centre.
In the same way to the 4x4, you can solve two adjacent edges fairly intuitively whilst preserving your white and yellow centres that are on the left and right. The only difference here is that the defined centre piece shows which colour you must build. If you’ve built the green centre and you’re moving on to the centre adjacent to its left, just look at the defined centre and build that colour using bars.
The last two centres are a bit more complicated here, but they’re still fairly simple. Just build the centre bar for one colour and a second bar and insert them. There are a few cases for 5x5 where the last bar will be harder to construct without disturbing your progress, but there shouldn’t be any that are too difficult that they require commutators (for 6x6 and 7x7, you may need commutators to solve specific centre pieces).
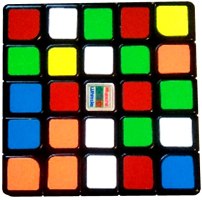
A single bar solved on the white centre
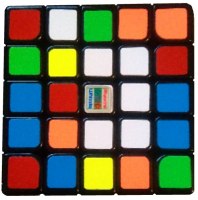
Second white bar solved on the white centre
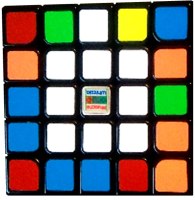
The completed white centre
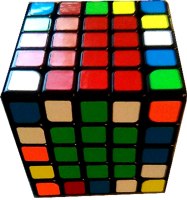
Two adjacent solved centres - On the image the white centre is on the left and the yellow is on the right
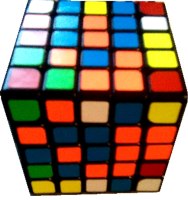
The last two unsolved adjacent centres
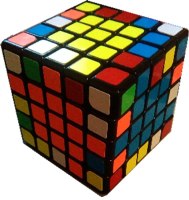
Complete centres
Edges
4x4 – The edges stage on even layered cubes is fairly similar to that of odd layered cubes. If you’re solving anything larger than a 4x4, however, then the 5x5 edges section may be better suited for this part of the solve.
With 4x4, since there are only two pieces that make up each edge, it’s fairly easy to build them in comparison to bigger cubes which may require more piece searching. You can connect pieces by putting them next to one another in the middle layer and doing a Uw’ move (this will disturb your centres, but this is fine). As shown in Figure 1, an edge has been made by slicing across to match up two pieces (to align two pieces, simply insert the matching piece like an F2L pair using R U’ R’ moves). Once you have an edge finished, you can do the following moves to swap the edge you’ve made with an unsolved one on the top layer (in this case, the edge in the UB position) – R U R’. The result of this combination of moves is shown in Figure 2 below. Simply repeat this process until you have four solved edges in the top layer (see Figure 4). As long as you only perform slice moves when the centres are as shown in the two images (i.e. they can be restored by undoing the slice moves), then they are fine (note: in Figure 3, if you were to perform the moves U’ R to put the edge piece on the top layer, the green-blue centre would be facing upwards, which means if you undid a slice move then the centres would be scrambled. Always make sure to keep the centres horizontal. In this case, the correct set of moves would be R U’ R’ which places the solved edge in the top layer and preserves the centre positions).
Once you’ve solved 4 centres on the top layer, flip the cube over and solve another 4 edges. Everything is exactly the same as the previous 4, just construct each edge and push it into the top layer. After this you should now have 8 total solved edges on the top and bottom. Now just realign your centres so they’re solved again (if your centres can’t be solved with Uw moves after you’ve done the first eight edges, then you’ve done something wrong and need to go back and rebuild the centres).
For the last four edges on 4x4, all you have to look for is pairs of adjacent edges. In Figure 6, the two white pieces can match up to make an edge. However, because there are no empty spaces in the top or bottom layers, we can’t connect them using the above method, we have to get creative. For this case, you can use what’s called the Flipping Algorithm to connect pieces. This algorithm flips an edge in the middle layer.
Flipping Algorithm: R U R’ F R’ F’ R
This algorithm is extremely useful for edge pairing in big cubes. It’s fast and efficient, allowing you to solve multiple parts of edges at a time in its most advanced applications. But for our purposes, we just need an algorithm that will efficiently solve simple edge pairs. Take Figure 6 as our example, the following moves would solve the green-white edge, but try and visualise how it happens:
Uw’ (R U R’ F R’ F’ R) Uw
The Uw’ move brings the “location” of the white-green piece above the piece that needs to go there. This means that the location of the piece is above the piece on the same edge. After performing the flipping algorithm, the piece has swapped places with the “location”, meaning it’s now in place. The Uw simply fixes the centres and pairs up the edge pieces.
The Last 4 Edges stage for the 4x4 is just a combination of slice moves (Uw and Uw’) and the flipping algorithm. There aren’t any awkward cases, and if two edges aren’t opposite one another as shown in Figure 6 (this is shown in Figure 7, where the leftmost green edge pairs with the rightmost red edge) then you can just do the flipping algorithm on one of the edges to positon them then perform the above combination of moves to solve it. This is one of the simplest stages due to the low number of combinations, hence the necessity for only one algorithm (this algorithm can also be utilized throughout the first 8 edges stage to correctly position an edge piece).
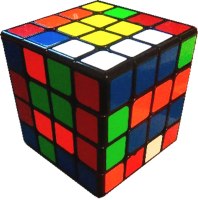
An edge being solved by slicing
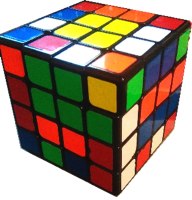
The edge in the previous figure is placed on the top layer
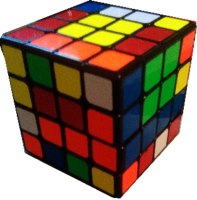
Second example of an edge being made by slicing
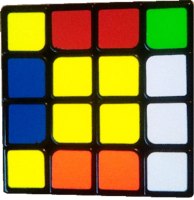
Four edges solved and placed on the top layer
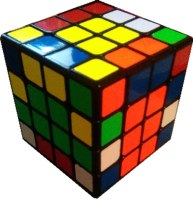
The first 8 edges solved (top and bottom)
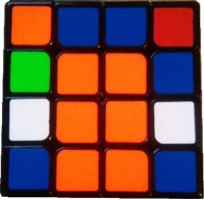
Last 4 edges and Flipping Algorithm example
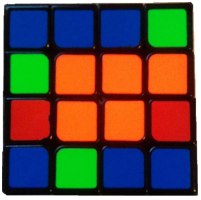
Last 4 edges and Flipping Algorithm example 2
5x5 – The odd layered edge pairing system is very similar to that of the 4x4 edge pairing, but on a larger scale. The layout is the same – 4 edges on top, 4 on the bottom, last 4 around the middle.
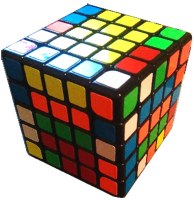
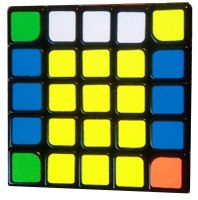
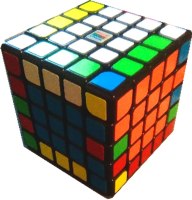
For larger cubes we need to use a slightly more advanced version of what we used above. For 4x4, we used Uw and Uw’ moves to build edges, whereas with 5x5 and above we need to do multiple slice moves to pair up the multiple pieces that constitute the edges. In Figure 1, an example is shown of how the different layers have to be manipulated to construct the edges in their entireties. Note, however, that when this completed edge is placed onto the top layer with an R U R’ move (shown in Figure 2), the centres can be restored with Uw and Dw layer moves. As long as the centre bars are kept horizontal and aren’t rotated (an example of this would be if you did an R2 on the cube shown, the blue and green centre bars would be swapped, disturbing the centres), they will be easily restorable upon completion of the first 8 edges.
Figure 3 shows the halfway stage of the first 8 edges – 4 solved edges placed on the top layer. Once you’ve solved four edges, flip the cube and solve another 4, placing them on the (now) top layer.
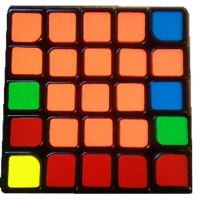
After you’ve completed all eight of the first edges (shown in Figure 4), you need to solve the last four edges. These are slightly more complicated on higher order cubes as you can’t simply slice-flip-slice to solve each one, however there are some similar variations that you can use to solve these edges easily.
Figure 5 shows the orange sticker of an orange-blue piece in the top left, and in the top right, the matching orange-blue edge and centre are joined together, but incorrectly (the centre edge piece is flipped). To solve this case, a Uw’ move would push the incorrectly placed orange-blue piece out of the way and match the correct orange-blue piece with the centre edge piece (shown in Figure 6). After using the flipping algorithm to flip the pair of two edge pieces (Figure 7), slicing back will reposition the last orange-blue piece and solve the edge (Figure 8)
The best way to approach the last 4 edges on big cubes is look for pairs of pieces, whether they’re flipped or not. If, in Figure 5, the two orange-blue edges on the right were correctly oriented (they matched), then you’d be able to place the last edge piece by performing a Dw’ (bringing the “location” of the final piece underneath the actual edge piece), performing the flipping algorithm and undoing the slice with a Dw. If you don’t have any pairs of 2 pieces matching, do a few Uw moves until you notice that two match, flip them to preserve them and undo the Uw moves.
The last four edges are mostly intuitive for bigger cubes, just try and use logic and what you already know about edge pairing and the flipping algorithm to learn some of the most common cases and how to recognise and solve them quickly and efficiently.
Parity can occur in 5x5 last 4 edge solving. This is visible as there is only one edge left unsolved (the centre edge piece is flipped in its place), as shown in Figure 9. This is fixable by placing the unsolved edge in the UF position and performing the following algorithm (NOTE: this algorithm is also used to correct OLL parity in the 3x3 stage of an even layered cube solve, see below for its further uses)
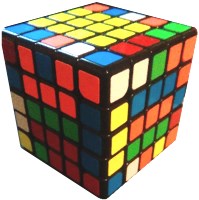
A solved edge built using slice moves
The edge solved in the previous figure is placed in the top layer
The first 4 edges solved and placed on the top layer
The first 8 edges solved (4 on top, 4 on the bottom)
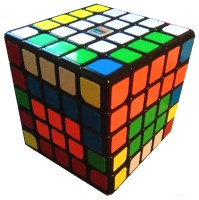
Last 4 edges Example Part 1: The initial state
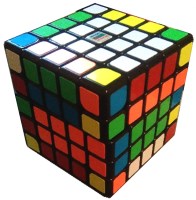
Last 4 Edges Example Part 2: After a Uw' move
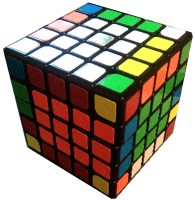
Last 4 Edges Example Part 3: After the Flipping Algorithm
Last 4 Edges Example Part 4: The completed edge
 An example of edge parity after the last 4 edges stage:
Edge Parity: Rw U2 Rw' U2 Rw U2 Rw U2 Lw' U2 Rw U2 Rw' U2 x' U2 Rw2
3x3 Stage
4x4 – The final step is arguably the simplest one if you know how to solve a normal 3x3 (which most people do, as these larger puzzles tend to be attempted by those who have already learnt how to solve the original Rubik’s Cube). You will have noticed that, now each edge has been solved and the centres have been separated, the cube resembles a big 3x3. The 4 centres on each side can now be treated as one, and each pair of two edge pieces can be treated as one edge. Using only outer layer moves, the 4x4 can be solved just like a normal 3x3 cube – Building the cross, then pairing corners and edges to insert them (F2L), orienting the last layer pieces (OLL) and permuting them to finish (PLL).
There is, however, one slight problem when solving even layered cubes. Because you’ve had to build the centres yourself in the correct orientation (due to the lack of a single defined centre piece) and there is no way of telling if your centres are actually correct, there is a possibility of parity occurring in two different ways.
Parity is the name given to an unpredictable outcome as a result of unpredictable/uncontrollable variables. There is no way of knowing on a 4x4 (or any even layered cube) if you’ve solved the centres correctly in relation to the core mechanism. These two parities are noticeable due to their violation of an odd layered cube’s defining properties such as a 3x3:
- Two edges cannot be swapped on their own without other pieces being affected (i.e. the only way to swap two edges and leave the rest of the cube how it was before being to physically remove them from the puzzle and replace them swapped, rendering the cube unsolvable. Some permutations demonstrate this – The J and T permutations swap two edges, but they also swap two corners, without which the edge swap would be impossible.
- An odd number of edges cannot be flipped in place. The only way to flip an odd number of edges on a 3x3 is to physically remove them from the puzzle and replace them flipped, also rendering the cube unsolvable.
On even layered cubes, these parities are noticeable during the OLL and PLL stages, hence the names OLL parity and PLL parity. If the first two layers on a 3x3 are correctly solved, then the orientation of the four top layer edges is only possible in one of the following ways:
- All four edges are oriented correctly (with white cross, all yellow edges are facing up)
- Two adjacent edges are oriented correctly
- Two opposite edges are oriented correctly
- No edges are oriented correctly (none of the edges are showing yellow on top with white cross)
OLL Parity becomes noticeable at the OLL stage due to the orientation of the last four edges. If you have an OLL case with either one or three edges oriented correctly, then you have parity (odd number of edges oriented = odd number flipped, an impossible position on a standard Rubik’s Cube). This can be solved using an algorithm that is relatively long and difficult to remember (you may hear speedsolvers complaining of OLL parity because of the added time it takes to correct the parity, slowing down their solve). An example of OLL parity is shown in Figure 2.
OLL Parity Algorithm - Rw U2 Rw' U2 Rw U2 Rw U2 Lw' U2 Rw U2 Rw' U2 x' U2 Rw2
PLL Parity becomes noticeable at the PLL stage due to the permutation of the top four edges upon completion of the orientation of the last layer. There are 21 defined PLL cases – These are cases that can appear on a 3x3 cube, there are no more combinations of pieces. If you know all of the PLL algorithms then noticing PLL parity will be easy for you – if the permutation of the pieces does not match a PLL algorithm that you already know, then you know you have parity. A simpler way involves performing a PLL algorithm that you do know until you’re left with the obvious confirmation that you have parity – Two adjacent edges are swapped or two opposite edges are swapped, and the rest of the puzzle is solved. An example of PLL parity is shown in Figure 3.
PLL Parity Algorithm: r2 U2 r2 Uw2 r2 Uw2 U2
Note: The r2 notation refers to the Inner-R layer ONLY (an R move would be the outer R layer, and a Rw would be both the outer and inner layers). This means that R2 Rw2 = r2
To replicate parity on a simpler puzzle, try solving a void cube – a 3x3 without centres. You will notice sometimes that you’re left with PLL parity at the end of some solves (two edges seem to have swapped places with no other affected pieces). This is because you have solved the cube around the incorrect centres (even though there’s aren’t technically any centres to begin with).
Read more about the 4x4 parity here...

A complete 3x3 stage on a 4x4 cube without parity
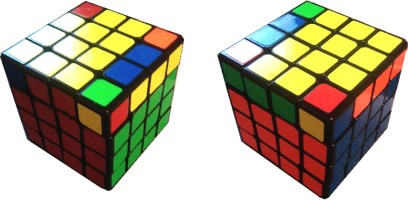
A front and a back view of an OLL parity case
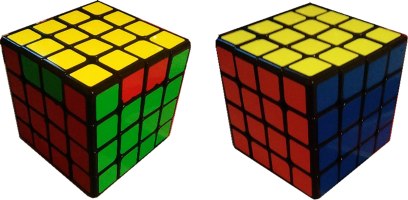
The front and back view of a PLL parity case
5x5 – The final step for odd layered cubes is an exact replica of the 3x3 stage. There are no parities on odd layered cubes due to their defined centres (in the same way a 3x3 doesn’t have parities), so there is nothing different about the 3x3 stage on a 5x5 and a normal 3x3 Rubik’s Cube (other than of course the size). Pictures have been provided regardless of the similarity in case confusion arises regarding how 3 edge pieces form one “edge” equivalent on the large 3x3.

The 3x3 Stage breakdown on a 5x5 cube
