Kilominx Twisty Puzzle - The 2x2 Megaminx
After the release of the original Rubik’s Cube garnered such a vast interest in twisty puzzles, other companies such as Mefferts released their own types of twisty puzzles. One of the first puzzles to be released was the Pyraminx, which led to the independent creation by multiple inventors of the Megaminx.
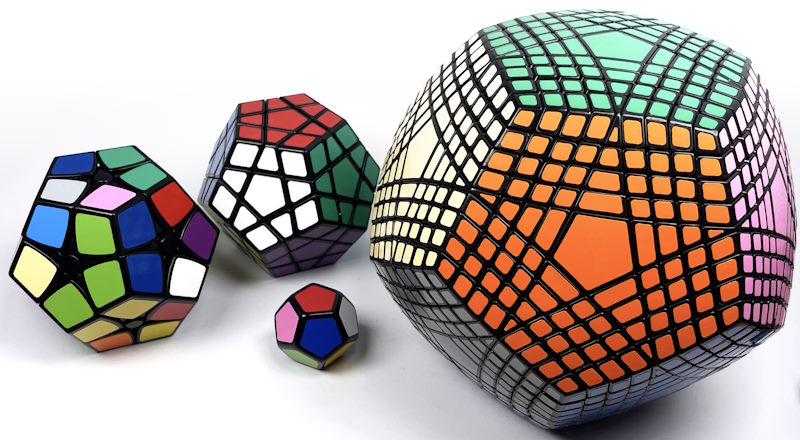
A scrambled Kilominx, a Megaminx, a 1x1 Dodecahedron and a Petaminx
The Megaminx is famous for its apparent difficulty yet simplistic solution (to those who can solve the Rubik's Cube). This in turn led to the creation of higher-order Megaminx puzzles, such as the Master Kilominx, Gigaminx, Teraminx etc. But what if it was made simpler? This is where the Kilominx puzzle comes in.
What Is A Kilominx?
The Kilominx (also called as Flowerminx) is effectively a 2x2 variant of the original Megaminx. Like the original 2x2 pocket cube, its edge pieces are internal and non-colored, meaning that the puzzle is solved once all of the corners are oriented and permuted correctly.
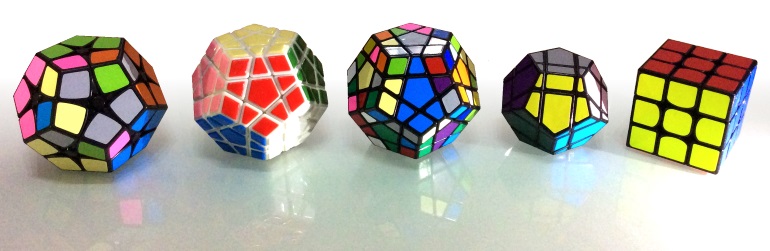
Dodecahedrons: Kilominx, white and black body Megaminx, 3x3 dodecahedron shape mod and a Rubik's Cube
The Kilominx was first conceived in 1982 and since then there have been a few different versions released, however the big update to the Kilominx timeline happened in 2016, when ShengShou released their own version. This puzzle has caught the attention of many due to its speedcube-style design, and some have suggested that it should be added as an official WCA speedsolving event, but as of yet this has not been discussed publicly by the WCA.
How To Solve The Kilominx?
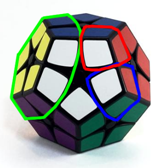
To be able to solve this puzzle, you should already know how to solve a Rubik’s Cube and its 2x2 variant. If you already know how to solve a Megaminx, then this puzzle should be mostly, if not wholly, intuitive. However, if you cannot solve the Megaminx, you should at least be familiar with how the puzzle operates and the notation that is used for some of the algorithms. On the image of the puzzle to the left, the dark green face would be turned in an algorithm with a D move.
The steps to solving the Kilominx are as follows. The color of each step indicates:
- Building the first layer – Place five corners of the same color in the same layer, oriented and permuted correctly.
- Place first F2L corners – Place the correct corners above those on the first layer, creating a pseudo-F2L.
- Place last F2L corners – Place the corners that are in the next layer sandwiched between the first F2L corners.
- Last Layer Orientation – Orient the corners on the last layer
- Last Layer Permutation – Permute the corners on the last layer, thus solving the cube.
The steps of this puzzle are almost identical to those of both the 2x2 and the 3x3, in which a layer is built and then the puzzle is solved upwards until the last layer, in which the pieces and oriented and then permuted. The only major difference with this puzzle is the two intermediate F2L-style steps, but these use the exact same algorithms as the rest of the steps.
The Steps Of The Solution
Building the first layer
This step is arguably the simplest of the entire puzzle. It is entirely intuitive (or uses one simple 4 move algorithm if you have learnt a beginner method) and can be done in the exact same way as the first layer corners on a 3x3, except with five corners instead of 4. The only real difference is the number of layers that can move and the increased number of locations in which the pieces can be. This may take a bit of time getting used to, so remember to follow your progress and check that each move you make isn’t disturbing what you’ve already created as you place each of the five pieces.
Place the first F2L corners
 This step is very similar to the way you would solve the first layer corners on a 3x3 after completing the cross. By holding the solved layer on the top of the puzzle, you would find the first layer corners and place them beneath the position where they belong and then repeat the algorithm R’ D’ R D until the corner is solved. A similar method can be applied for the first F2L corners on the Kilominx.
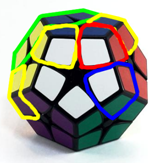
Start by holding the first, solved layer on the left-hand side of the puzzle (as shown by the green highlighted area on the image) so that the piece you want to solve is in the red location. The piece highlighted blue shows where you should move the correct piece to. The equivalent scenario is demonstrated below on a 3x3, where the yellow layer would be your first layer.
 Notice in the image of the kilominx how the corner of the first layer shares two colors with the target corner; in this case, blue and white. This will give you indication on how to find the correct piece, as only two pieces on the puzzle have both blue and white stickers, and one of them is already solved.
When moving the target piece to the blue position, remember to do moves that do not disturb your first layer. Once the piece is in the correct position, perform the algorithm R’ D’ R D until the corner is solved in its correct position (i.e. the colors of the corner on the first layer match the color of the corner you’ve just placed, which in the image would be the blue and white).
Keeping the first layer on the left, rotate the entire puzzle so that a new, unsolved piece is in the red position. In this case, you could rotate the puzzle so that the white-purple-green piece is now in the red position. Also, remember with each piece you solve you are further restricting the moves you can make. Take extra care when moving the correct corners to the blue position, as you may disturb what you’ve already done.
Place the last F2L corners
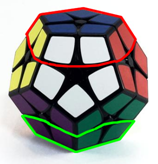
 This next step follows a very similar format to the one above, however the puzzle needs to be held in a different way. The first layer you did at the very beginning needs to be held in the back-left of the puzzle (indicated in green on the image). To help you to understand this orientation a bit better, the pieces you have just solved should be in the positions highlighted in yellow on the puzzle. Following this image, the green layer would be the last layer, but it may not be for you.
Once again we have both red and blue slots. The red slot refers to the target location for the piece that we want to solve, and the blue slot refers to the place that we need to move the target piece into ready to be solved, just like in the previous step.
To determine which piece needs to go into the slot you have, you need to look at the solved pieces surrounding it. In the case of the red slot on the image, we know that the top layer is blue (as the rest of the pieces on it are already solved and are blue), we know that the front layer is white (as the solved piece shown in yellow on it is also white) and we know that the right layer is red (as the solved piece shown in yellow on it is also red). This means that the piece we want to place in this position has blue, white and red stickers.
Most of the time the piece you’re looking for will be on the layer opposite your first layer (the dark green layer on the image). In this case, you simply have to move that layer until the piece you want to solve is in the blue position, then do the same algorithm as before to solve it: R’ D’ R D. Remember, you may have to repeat this algorithm multiple times before the piece is solved.
Once you have solved that piece, keep the first layer you solved in the back left and rotate the entire puzzle so that the new red slot is unsolved again (in the image, if you rotated in the same way as the previous step, the new red slot would be the yellow-white-purple piece).
If the piece you’re looking for is not in the bottom layer (the dark green layer on the image), this means that it is incorrectly solved in a different slot. Rotating in the same way as described above, rotate the puzzle until the piece you are looking for is in the red position. Then, perform the algorithm R’ D’ R D to remove the piece from that slot, then rotate back to where you were. The piece will now be in the bottom layer, so you can follow the above step.
Last Layer Orientation
 Upon completing the previous step, the entire puzzle should be solved bar one layer. This layer will be opposite the one you first solved. Hold the puzzle such that the unsolved layer is on the top of the puzzle.
If you started with the white layer, then the unsolved layer will be grey. If you do not know what color your unsolved layer is, all of the pieces on it will share the same color, so just look for the color that is present on every single corner.
The image adjacent shows how you should hold the puzzle, where the area highlighted green shows the first layer you built and the area highlighted red is the last layer, which should currently be unsolved for you.
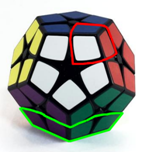 First, look at the puzzle to see which corners are already oriented. A corner is oriented if the color of the top face is facing upwards. You could have any amount of corners that need to be oriented (except just 1). For each incorrectly oriented corner, place it in the red position as shown and perform the following algorithm until it is oriented: R’ D’ R D
Once the corner is oriented, do the required number of U moves to get another incorrectly oriented corner into the red position. Keep in mind that this algorithm will disturb the right and bottom layers, but if you do the algorithm correctly and only do U moves to position new corners, the layers should return to their solved states once all corners have been oriented.
Last Layer Permutation
Once you’ve oriented all of the corners, all that remains is the permutation of them. Permutation simply means moving the corners around until the entire puzzle is solved. For this step you don’t have to hold the puzzle in a different way, but you do have to rotate it sometimes, keeping the layer you’re solving on the top.
 From the 2x2’s last layer permutation, you may recognise that there are “bars” on some sides of the puzzle. A bar is when two adjacent pieces share the same color. You will either have two bars or no bars on your puzzle. If you have two bars, place one on the left and one on the right and do the following algorithm:
R U R' U' R' F R2 U' R' U' R U R' F'
This will leave you with no bars remaining on the puzzle.
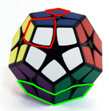
From a state with no bars, you need to do a couple of things. First, move the U layer so that two corners are solved. You can tell if a corner is solved when its outer colors match with the colors on the rest of the puzzle. Secondly, rotate the puzzle so that one of these corners is in the front left and the other is in the back, as shown in red on the image, and perform the algorithm again. If the puzzle still isn’t solved, do the algorithm from the same angle one more time and your puzzle will be complete.