The Fisher Cube
The Fisher Cube is one of the best known 3x3 shape modifications in existence. Invented and named after by famous puzzle inventor Tony Fisher. It was invented sometime during the 80s, inspired by the original Rubik’s Cube. The puzzle has a very similar solving method to a 3x3, so make sure you can solve that using at least the beginner’s method before you tackle the Fisher Cube.
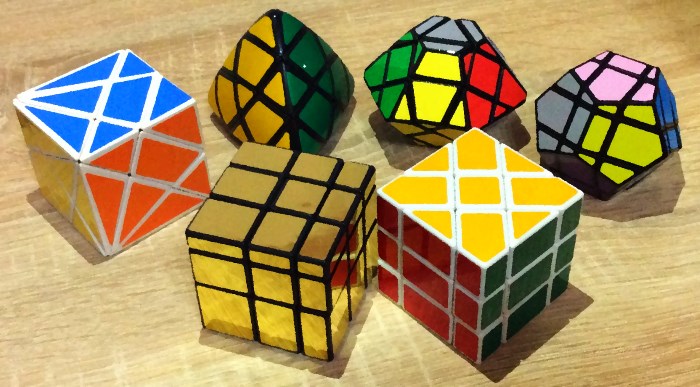
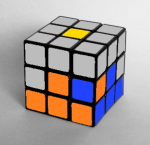
The Fisher Cube among other modified 3x3s'
Notation
The Fisher Cube is a strange puzzle and can take some time to get used to if you’re not familiar with anything beyond standard NxN puzzles such as the original Rubik’s Cube. The puzzle has the exact same notation as standard puzzles; using letters to define face turns, such as:
R – A clockwise quarter turn of the right face.
R' – An anti-clockwise quarter turn of the right face.
R2 – A half turn of the right face in either direction.
If you need further clarification for this standard notation, check the Rubik's Cube Notation here.
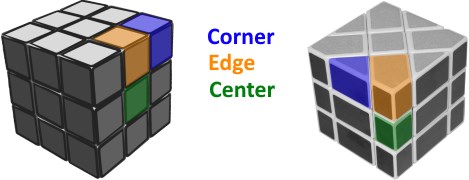
Despite using the exact same notation, the Fisher Cube has slightly different definition of edges, corners and centres. Below are pictures of a standard Rubik’s Cube and a Fisher Cube with arrows pointing out the centre, edge and corner pieces on each puzzle. This is important to understand fully how the puzzle functions and what the differences are when solving it.
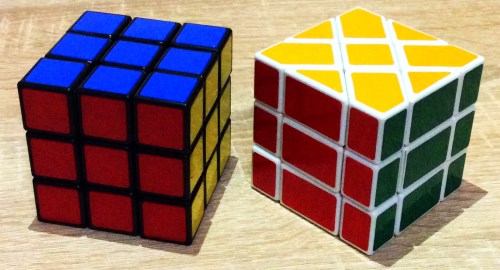
A Rubik's Cube compared to its shape-mod, the Fisher Cube
These differences in piece labelling are vital for being able to correctly solve the Fisher Cube. The two images above were chosen specifically as they both show the puzzle from a face-on perspective. The red-green centre piece on the Fisher cube related to the red centre piece on the normal puzzle. From both these positions, it is easy to see how a R move would be made (the right-most layer on the standard puzzle and the triangular shaped right-most section of the Fisher cube). Keep this similarity in mind when solving the puzzle.
Also, as a side note, there is only one type of edge on a standard 3x3 – a two coloured piece that fits between two corners and two centres of the puzzle. On the Fisher Cube, there are two different types of edge piece – Three-coloured house-shaped pieces that look like they should be the corners, and one-coloured rectangular pieces that look like they should be centre pieces. This will be important during the solving phase.
Overview
Here is an overview of the steps required to solve the Fisher Cube:
- White Cross (with correct centre orientation)
- White corners
- Remainder of F2L (first two layers)
- Parity correction (if necessary)
- OLL and PLL
This solution has a few key differences to that of a standard Rubik’s Cube. These will be detailed in each step’s tutorial section. Parity only occurs 50% of the time, so keep in mind that you might not always have it.
Cross
This section will only be briefly explained as you should be familiar with the 3x3 beginner’s method, and therefore familiar with the concept of building the cross. The Fisher Cube has two solid one-colour centres (usually white and yellow, but these centres are whatever your top and bottom faces are when the puzzle is solved). For this tutorial, we will use the white centre and thus a white cross. The top and bottom faces have four of the aforementioned house-shaped pieces connected to them when the puzzle is solved. You must build the cross so that you have an X shape of cross pieces that are attached to their corresponding centres (remember that the centres on the Fisher cube are the two-coloured pieces that look like 3x3 edges). Don’t worry about centre orientation just yet, just make sure that, for example, the white-orange-green edge is connect to the orange-green centre piece.
Once all four cross pieces have been inserted, you can correct the orientation of the centres. On a 3x3, each centre only has one colour, so the orientation doesn’t matter. However, with the Fisher Cube, the four middle-layer centres have to be orientated correctly or the puzzle will not appear solved. To check to see if a centre is correctly oriented, look at one of the cross pieces. The two-coloured centre should be vertically attached to the edge so it makes a solid bar (see the picture below).
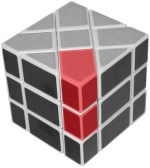 In this picture, the two highlighted pieces are the pairing between one of the house-shaped cross pieces and the two-coloured centre piece below it. This centre is in the correct orientation, but it can also be incorrectly oriented (most commonly the centre is on its side, but it can also be vertical but flipped). If the centre is incorrectly oriented, then you can easily fix it by rotating the cube so that the cross is on the bottom, bringing the edge-centre pair to the top and doing a U to temporarily disconnect the edge and centre. Then, simply rotate the centre so that when you bring the edge back, it will be correctly oriented. Then you can re-attach the piece to the cross and move on to the next one. Upon completion of this stage, the white cross should be solved and all four of the middle centres attached to the cross pieces should be correctly oriented.
White Corners
The corners on the Fisher Cube are the small two-coloured triangular located between the house-shaped edges on the top and bottom of the puzzle. This means that you can solve them in the exact same way that you would using R and D moves in the beginner’s method. If you can solve this stage on a standard 3x3, then this stage should be relatively easy – Just place the corner beneath its position and repeat the algorithm R’ D’ R D until it is solved.
Remainder of F2L
Solving the remainder of the first two layers involves attaching the rectangular one-coloured edge pieces to their respective corners. This can be done in a similar way to the edge insertion on a standard 3x3 to complete the second layer. Since the edges are one-coloured, it doesn’t matter if you perform either the F2L Right or F2L Left algorithms (see the beginner’s method if you are unsure of what these algorithms are), however we will stick to using just one of these algorithms for this section. Look at the position where the edge needs to go (we’ll call this the target), and place the edge that you want to solve over the centre piece that is to the left of the target. Hold the puzzle so the edge you want to solve is facing you directly, then perform the F2L Right algorithm – U R U' R' U' F' U F.
Repeat this step for all four one-coloured edge pieces to complete the first two layers
Parity
It's possible on this cube in a similar way to a 4x4 puzzle parity, but for different reasons. On a standard Rubik’s Cube, when the first two layers are solved correctly, there are three different numbers of oriented edges on the top layer – 0, 2 and 4. This is because you cannot flip a single edge, therefore if every other edge is solved, then the number of oriented edges must be even. On the Fisher Cube, however, you could end up with any number of edges oriented. If you have an odd number oriented (1 or 3), then you have parity. Remember, these are the house-shaped pieces, as we are dealing with the top layer edges.
This parity is the result of the previous stage. On a 3x3 you have to insert each of the F2L edges in the correct orientation, or they will be noticeably flipped. With a mono-coloured edge piece, you can’t tell which way around it has to go. If you have an odd number of edges oriented on the top layer, you also have an odd number of edges oriented in the middle layer. To fix this problem, simply flip one of the middle layer edges. This will rebalance the number of oriented edges in the middle layer, thus resulting in fixed parity. Think of the piece in the middle layer as being in the position shown below on the standard puzzle. This is obviously visible on the 3x3 because there are two colours, but with only one colour on the edge, you can’t tell which is the right way.
 To flip one of the middle layer edges, either perform an intuitive set of moves if you feel comfortable solving the pictured case on a 3x3, or perform the following algorithm from any orientation:
R U R' U2 R U2 R' U F' U' F
This will flip one of the middle layer edges in its place, resulting in an even number of oriented edges on the top layer.
OLL and PLL
Once any potential parity has been fixed, the rest of the cube is solved exactly the same as a standard 3x3 puzzle. It is recommended that you use OLL and PLL algorithms to solve the remainder of the puzzle. This involves orienting all four edges, then orienting the four corners, then permuting the pieces to finish the cube. Please remember that the corners and edges are “swapped” on a Fisher cube, so the house-shaped pieces are actually edges and the two-coloured triangular pieces are actually corners. This is important as some cases may appear to be different cases if you don’t remember this. An example of this is the E permutation. On a 3x3, an E permutation means that all of the edges are solved and none of the corners are. Because the edges on a Fisher Cube look like corners, an E permutation looks like a Z permutation at first glance.
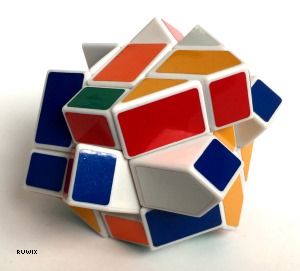
Scrambled Fisher Cube waiting to be solved
F R U R' U' R' F' 2R U' R' U' R U R' F', I think this is it, if not, reply