How to solve the Rubik’s Cube Blindfolded
Solving the Rubik’s Cube is a major accomplishment. Something that not many people actually accomplish. Once you learn how to solve the cube, you realise just how simple it is. As a speedcuber, I sometimes find it difficult to comprehend that it is seen by many as nearly impossible.
- 1 Old Pochmann
- 2 The Algorithms
- 3 Notation
- 4 The Buffer
- 5 Edges
- 6 Corners
However, once you master the cube, you want more. Sure, you can go up to the bigger cubes such as the 4x4, 5x5 or further. You could go down to simpler puzzles, like the 2x2 or the Pyraminx. But for those of you who want an extra challenge, something to really test your memory and ability, you might want to try to solve the cube blindfolded.
Blindfolded solving is popular amongst speedcubers, but there are a lot of people who just like to do it for fun. Most people believe that solving the cube sighted requires amazing memory capacity, let alone solving it blindfolded. But in reality, it’s just as easy, if not easier.
There is nothing more rewarding than taking off a blindfold and seeing a solved Rubik’s cube in front of you. In this article I’m going to teach you how to do it.
Old Pochmann
Old Pochmann (or OP), is one of the oldest blindfolded methods to date. It was developed by Stefan Pochmann who in 2004 secured the German National Record for 3x3 Blindfolded. He managed to break his own record 4 times in 23 months, before he lost it to Thomas Kohn. He reduced the NR from 35 minutes to just 7.
Nowadays, Old Pochmann is still used by many. However, speedsolvers who compete to solve the cube blindfolded as fast as possible have switched to newer and faster methods. But Old Pochmann is still capable of achieving times under 2 minutes if you’re interested in speedsolving with it.
The Algorithms
Solving the cube blindfolded requires considerably less algorithms than solving it sighted. Using the Old Pochmann method, you can solve the cube with as little as five algorithms. If you know how to solve the cube sighted, you may already know a few of these from the advanced Rubik's Cube tutorial:
- All pictures show the top face of the cube as these are PLL algorithms - Please read the advanced Rubik's Cube Notation if you don't know what the letters mean.
T Permutation
 R U R’ U’ R’ F R2 U’ R’ U’ R U R’ F’
This algorithm switches the two right-most corners and the edge in between them with the edge opposite it.
Ja Permutation
 R U R’ F’ R U R’ U’ R’ F R2 U’ R’ U’
This algorithm switches the two right-most corners and the edge in between them with the edge adjacent on the front face.
Jb Permutation

 y2 L’ U2 L U L’ U2 R U’ L U R’ y2
This algorithm switches the two right-most corners and the edge in between them with the edge adjacent on the back face (it is important to note that to perform this algorithm you need to rotate the cube so you are holding the cube in the orientation shown to the right before doing the algorithm. Then, you need to rotate back to continue.
Y Permutation
 F R U’ R’ U’ R U R’ F’ R U R’ U’ R’ F R F’
This algorithm swaps the bottom right corner with the top left corner, and the two top left edges. It is important to note that this algorithm isn’t performed exactly like this, but you’ll see why later.
Ra Permutation (The Parity Algorithm)
 y’ L U2 L’ U2 L F’ L’ U’ L U L F L2 U y
This algorithm swap the two back corners and the two adjacent edges on the front and right. This algorithm requires a rotation before and after because the pieces you need to swap are not directly in front of you. Also, the U move at the end must not be missed out, otherwise the top layer will be misaligned by a U’ which will ruin everything you’ve memorised.
Notation
Notation is very important in blindfolded solving, as you need to know where you are going to send your pieces. You first need to pick your orientation. I recommend having yellow on top and orange on front, as it is the most popular orientation.
With blindfolded cubing, we work with stickers instead of pieces. When solving a piece, it needs to be in the correct orientation. Just remembering the piece itself is not sufficient, as there is a chance the piece will be flipped in its place. Therefore, each sticker on each face has a letter (except the centre sticker).
You need to assign a letter to each sticker on your cube. I have shown my lettering scheme below. You must remember that most of the orientations you see won’t be the same when you’re solving, because if the red face is on the back, the letter scheme needs to be flipped. Because letters and corners are solved separately, you can have the same letter for two stickers.
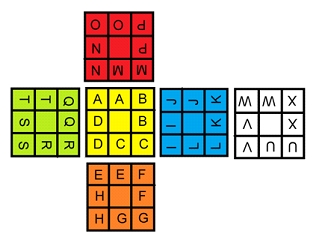
This diagram may seem confusing. If you want, look at each face as though you are going clockwise around it with two of each letter being written.
For example –
The YBO corner has the letters C, I and F respectively.
The OW edge has the letters G and U respectively.
The Buffer
Old Pochmann is heavily reliant on a buffer piece which is used as a starting point. For edge solving, the buffer is the UR edge. So, using the orientation recommended above (Yellow on top, Orange on front), the buffer edge would be the YB edge, and the buffer corner would be the YRG corner.
The way Old Pochmann works is you use the buffer piece to “shoot” pieces to their correct locations in their correct orientations.
Edges
So, now we know the basics of OP, let’s get started!
First, do this scramble on your cube -
R2 B2 D R2 D’ U’ R2 F2 L2 B2 D2 F U2 R’ F U’ L2 B L F2 U
Remember to scramble with white on top and green on front.
Your cube should look like this:
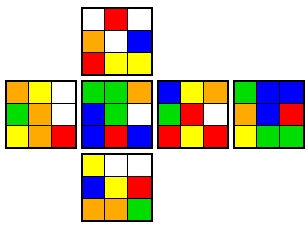
When you first look at the cube the first thing you need to do is rotate it so it is in your preferred orientation (for this scramble, please use the orientation yellow on top, orange on front). Next you need to look at the buffer edge. Which edge is in the buffer position: Orange-Green. More importantly, the orange sticker is on top.
Your next task is to locate the orange-green position (where the orange-green edge would go when the cube is solved). You can see that it would go in the front-left position.
But because it is the ORANGE sticker on top, you need to shoot to the ORANGE position. The edge currently in the orange-green position is the white-blue edge.
Using the letter scheme above, we can see that this would be the letter H. So we remember that letter and move on.
Pretend you’ve swapped those two edges. The white-blue edge would now be in your buffer with white on top. You need to be able to see this because once you don the blindfold, you can’t rely on vision to tell you where the sticker is. So where does the white-blue edge need to go? The white blue position, of course. This is the DR position. But remember – We’re shooting to the WHITE side of the position, not the blue side. Therefore, using the letter scheme we can see our next letter is V.
You now have two letters. H and V. If you continue like this, you will most likely forget the letters. So we associate the letters with people, objects, places, anything. You just need to think of something, so that when you recall that something later on, you will immediately think of the letters H and V. The best way to make sure your letters are memorised effectively is to memorise them two at a time.
If you plan to do this quickly you can’t spend 30 seconds thinking of a great, vivid image. You need to think of a decently memorable image and move on. The first thing that would come into my mind would be HooVer. So I think of a hoover. The remainder of the memorisation will dictate whether you need to think of the hoover doing anything, or just a plain simple hoover.
Now you pretend you’ve just shot to the white and blue edge. Which piece is in that position now? Red-Blue. But, once again, you shot to WHITE, meaning that the sticker that is on top in your buffer would now be red. So you look for the red blue position, in this case it is BR. Using the letter scheme, you can see that the red sticker in this position has the letter P. So you remember P.
What is in your buffer now? White-Orange. Look for the white-orange position. It’s UF. Now, look for the letter associated with the white sticker (because white is on top). The letter is U.
This is really it for edges. All you do is jump from edge to edge, solving them as you go along, one by one, remembering letters along the way.
Our current letters are HVPU. We have a HooVer, but what could PU be? You could either think of another object (the most obvious being a poo), or you could think of an adjective to describe the HooVer. I would probably remember PU as PUshes. The next two letters will indicate what exactly the hoover is pushing in my mind.
As long as what you are memorising makes sense, it really doesn’t matter what your letters are. You are free to explore your own imagination to find things that remind you of the two letters you are trying to remember.
Okay, let’s skip ahead. If you follow the steps above, you will have memorised the letters - HVPUEFTXDW (my memorisation for this would be – A HooVer PUshes with EFfort a TaXi DoWn)
This is not the end of the edge memorisation, and you will see why shortly. But how would we solve the cube up the point we have memorised? Enter the algorithms.
To solve a piece, we do what is known as A B A’. The letter A refers to a setup move. Let’s go back to the start – The letter H. You need to get this sticker on to the top face, in one of the 3 edge slots (the buffer is in the 4th). This can simply be done by doing an L’. This moves the edge opposite the buffer. What algorithm do we know that can swap opposite edges? The T permutation.
By doing the T permutation, we are swapping the buffer with the next edge in our memo. After performing the algorithm, you must remember to undo your setup move by doing an L move, hence the A’. If you do this sighted, you will see that what you have done is solved the piece. The green-orange edge is in its correct position.
But it is extremely important to remember the following – The T permutation doesn’t JUST swap two edges. No algorithm does; it’s impossible. It also swapped two corners, the two right-most corners on the U face.
This is why we memorise in pairs. Because we need to keep track of this. If we “shoot” edges to their correct positions an odd number of times, these two corners will be swapped. This is why we have to do parity, but more on that later.
So you have your first edge solved. Congratulations, 11 more to go. The next letter you remembered was V, or the RD edge. Because you remembered V, you know that you need to get the sticker at V on top, not the other sticker on the same edge (Otherwise, you would’ve remembered the letter K instead).
Your first instinct might be to just do D’ F2. It’s in the top face, right? This is a massive problem that new blindsolvers have – Preservation. The two corners that are sandwiching the edge are swapped. If you were to do D’ F2 to get the V sticker to the top face and then doing an algorithm, you would be completely destroying the original corner positions. It goes without saying that after you have solved edges, the corners MUST be in the same place they started before you put the blindfold on, or you won’t have any idea how to solve them.
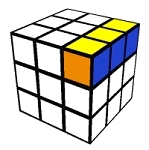 So from now on you need to remember that your setup move cannot in any way disturb the three top-right pieces shown in the picture.
So, to get this on the top face you can just do D2 L2 as your setup. This puts the position you are shooting to in the same place as last time – opposite the buffer. So you can do a T-permutation again, and undo your setup moves, by doing L2 D2.
You now have 2 edges solved. And, the corners have been swapped back, so your corners are now back to normal.
The next letter is P, or the BR piece. We know that you cannot simply do a B move, as this would disturb one of the corners. We could, however, do Dw2 L’. Press the play button below to see how a Dw2 move is done if you are unsure. This puts the position we need to shoot to opposite the buffer edge, so we can once again do a T permutation and undo the setup with L Dw2.
Now, have a go at doing solving the letter U by yourself. When you think you’ve got it or are unsure, see the spoilers below to reveal the answer.
To setup the U sticker to the position opposite the buffer, you could do D’ L2 as a setup move. Then it’s simply a T-permutation followed by the undo of the setup, L2 D.
Okay – hopefully you were able to do that without help.
You now understand the basics of edge solving when the easiest way to get the sticker to the top layer is to place it opposite the buffer piece. But this isn’t always the most efficient way.
For the next edge, our target is E. You might think that this piece is already in the top layer, but it isn’t. The sticker you need to shoot to is on the front face. You can’t just do F’ L’ because then you are disturbing one of the corners. So what can you do?
Well, we have 5 algorithms for a reason. You could use a complicated setup to get the sticker opposite the buffer, but it’s much easier to get it to either of the two remaining edge positions.
The simplest setup for this edge is to do Lw’, which places the correct sticker on top in the UB position. From here, we can do one of our other algorithms to swap it with the buffer, then simply undo the setup move to solve this edge.
So, this is what you would do –
Lw’ (puts the edge in place) [y2 L’ U2 L U L’ U2 R U’ L U R’ y2] (swaps the edges) Lw (undoing the setup move, solving that edge)
This is also the same in the inverse. Sometimes it is easier to get an edge to the UF position, and you know an algorithm for that already.
The edges letters that are easier to solve with J permutations are E, M, G, K, O and S. For every other letter target, you should try to get the position opposite the buffer, because the T permutation algorithm is much more fluid and, if you’re aiming for speed, faster to perform.
So, now you know two more algorithms that solve those difficult edge cases.
Have a go at the remaining letters up to the point we’ve gotten to –
FTXDW
Help is below if you need it.
F – Dw2 L (T permutation) L’ Dw2
T – Dw L’ (T permutation) L Dw’
X – L2 (T permutation) L2
D – T permutation
W – D L2 (T permutation) L2 D’
If you look around the cube you should now see that all but two edges are solved.
But we have a problem. We haven’t finished our memorisation, but the buffer edge (the yellow-blue edge) is in the yellow-blue position, flipped. If you look at the UB edge you can see that the yellow-red edge is also flipped in its position.
This can happen any number of times when solving edges. If you’re lucky, it won’t happen. If you’re unlucky, it’ll happen several times. What you have to do is called “breaking into a new cycle”. You choose a random unsolved slot and you shoot to that position as if you were solving a piece. This simply sends the buffer piece elsewhere, and you can continue with the next edge.
In our case, the only places you can send the buffer piece without disturbing a solved piece would be either sticker A or sticker M. The easiest one to do would be A, because it’s already set up in the correct place for you to execute the Jb permutation required to swap it with the buffer. However, if you wanted you could do an Lw move and do the Ja permutation to send the buffer to the M sticker.
For the sake of simplicity I’m going to shoot to the A sticker. If you are practicing sighted you can just do this now, but in a real blindfolded solve, you would simply add the letter A to your memorisation.
Now you have the red sticker of the red-yellow piece in the buffer. Its position is the M sticker. So you would shoot back to M by doing an Lw setup to bring the M sticker to adjacent the buffer on the front face, and then do the Ja permutation algorithm to solve the M sticker, then undo your setup by doing Lw’
Now you have successfully completed edges.
With the cube, it is important to note that it is impossible for just one edge to be flipped in its place. You can’t have 11 solved edges and 1 flipped edge. Therefore, after shooting to the M sticker you know that your buffer is now also solved.
Your memorisation for the edges step would be – HVPUEFTXDWAM.
It is important that you are able to find and remember these letters from the scrambled state. This isn’t too difficult; all you need to do is jump from piece to piece, remembering the letter that each sticker you come across needs to be sent to.
Take a second to count the number of letters in your memorisation. If you used pairs, you will have generated an image involving six entities, whether they are physical objects or actions.
Remember those two corners that we weren’t allowed to disturb? Well, because we have shot to an even number of edges, those two corners have been swapped an even number of times, meaning that during a solve, if you were to go on to solve corners, they would be back in the position you remembered them in.
This is not always the case however. You could have an odd number of edge targets. This is mainly caused by a number of cycle breaks or having one solved edge when you start your memorisation. If you have an odd number of edge targets, you will also have an odd number of corner targets, meaning you have parity.
We can discuss this later however, as it is not immediately necessary for our solve.
Please solve your cube manually and do the scramble again –
R2 B2 D R2 D’ U’ R2 F2 L2 B2 D2 F U2 R’ F U’ L2 B L F2 U
Remember to scramble with white on top and green on front. When you’re done, rotate the cube so yellow is on top and orange is on front.
The Downside to the Buffer
Not every edge section of every solve will be perfect; the pieces won’t just all happen to be in one big cycle. Sometimes, maybe even multiple times during one solve, before you finish your edge memorisation, the buffer piece will end up in its correct spot. Sometimes, this can completely ruin a solve as you might think that because the buffer is solved, every other edge is solved. Every time your buffer piece is solved (or flipped in its correct position), you need to count the number of edge targets you’ve already solved. It helps me to touch each edge with a finger and hold the cube so that each edge that I’ve already memorised is being touched. If there’s an edge that you haven’t shot a piece to, look at it. If it’s already solved, then you don’t have to worry. If it isn’t, then you need to do what’s called “breaking in to a new cycle”.
Remember in previous steps we’ve shot correct pieces to correct locations? For the buffer, you can’t shoot it to its correct location because it’s already there. So what you need to do is send it to an unsolved edge. Do as if you were solving the edge you’re shooting to. This will “get rid of” the buffer piece and give you a new piece to solve. From here, you can continue on. The only things you need to remember are that you want to shoot to an UNSOLVED EDGE (so as not to ruin anything you’ve already done), and you need to treat it as though you were solving the edge – This includes remembering the letter for the sticker you’ve sent the buffer to.
Flipped Edges
If you have a flipped edge, there is one fact about the cube that you need to remember –
You cannot have an odd number of flipped edges. If you can solve the Rubik’s Cube, take one edge out and flip it. Then try to solve it. The closest you can get is back to the solved position with one flipped edge. If you have a flipped edge, you have two.
Use this to your advantage. Take a look around the cube before you do your solve. Is there a flipped edge solve in its place? If so, make a note. If there are more than 1 edge like this, note that too.
Go about your memorisation like normal. When you get to the end of your memorisation, you should notice that the buffer piece returns to the buffer flipped (provided there are an odd number of edges flipped in their places). Remember the location of the flipped edge(s) and continue with your memorisation.
When you get to the same point in your solve, shoot the buffer to either one of the stickers on the flipped edge. Then, shoot to the other sticker of the same edge. This will flip both the buffer and the piece that was originally flipped, solving the edges.
If there are two flipped edges in their correct positions, your buffer will be solved correctly (this is because you can only have an even number of flipped edges). Do the same as above, shoot to one sticker of the edge and then to the other sticker of the same edge. This will solve one of the edges and flip your buffer. Now, do the same with the final flipped edge to solve the last edge and re-solve your buffer.
Corners
Now for corners. Because there are only 8 corners, there will be less targets to remember than for edges.
We use the same lettering scheme above, but this time with the corners. Our buffer piece for corners is the ULB piece.
With edge solving, we had to use one of three algorithms depending on where it was easiest to get the edge to. With corners, we only have one algorithm because there is only one useful position. But don’t worry – it is easy to get any of the 21 possible stickers to this place. The position is the sticker at letter L on the scheme above, or the blue sticker of the blue-white-orange corner.
Remember how with edges we had two corners that we could not disturb? Well this time, we have two edges that we cannot disturb. These are the two edges that are touching the buffer piece, the UL and UB edges. This gives us a little more freedom with setup moves as they are all close together.
Now, first thing you want to do is look at your buffer sticker. It is the white sticker of the white-red-blue piece. If we use the letter scheme we can see that this makes our target the letter W. The sticker in that position is the white sticker of the white-green-orange corner. This would make our next target the letter U.
By repeating the memorisation process we did for edges, remembering to assign objects/actions to letter pairs, we have the following letters-
WUOIRJ – My memorisation for these would be Well Under OIled ReJiment (it’s okay to substitute letters for ones that sound similar, just make sure not to get confused!)
Now – How do we swap the buffer with the L sticker?
If you do a Y Permutation in a normal solve, you will have noticed that it swaps two opposite corners on the U face, the sticker in position A with the sticker in position C. But it’s not always easy to get the piece to the C position, so instead we get it to L.
If you look closely at a Y permutation being executed you notice that it starts with an F and ends with an F’. This puts the C sticker into the L position, does an algorithm, and puts the L sticker back to C. So if we miss out the first F and last F’ from the Y permutation, we can swap the buffer sticker with the sticker at L. It’s just a cancellation of moves to make the algorithm simpler for the purpose it serves.
So how would we get the position we need to the L position? It should be fairly intuitive. You just need to remember not to disturb the buffer or the two edges sandwiching it.
For example, the first letter is W. The way you could get W to position L is by doing D2 F’. Do it now on your cube, and watch how the sticker that originally was at W moves to L. For every sticker target on the D face, you can do a similar setup – For U, our next target, you can simply do F’. Or for X, you could do D F’. The next target is O. To get this to L, all you need to do is D’ R.
It is quite simple to setup buffers, just make sure it’s not too complicated and you remember it.
Try doing the rest of the corners yourself. Help is in the spoiler below again:
I – R’ (Y perm without F moves) R
R – F2 (Y perm without F moves) F2
Congratulations! You now know how to solve the cube blindfolded. There are a couple last things you need to know however before you go.
Order – The most popular order for the OP method is the following:
Memo Edges -> Memo Corners -> Solve Corners -> (fix parity if you have it) -> Solve Edges
The corner memorisation is much smaller than the edge memorisation. In this order, your images don’t have to be as vivid as edge memorisation, as you can remember the letters by themselves for a few seconds whilst you don the blindfold and solve them. Then you can focus on edges, the step that you have taken more time to memorise.
Parity – Parity is where the last algorithm we have learnt is used.
If you come to the end of edge memorisation and notice you have an odd number of targets, you don’t need to count corners. Because of the way the cube works, an odd number of edge targets will always equal an odd number of corner targets. So the second you realise you have an odd number of edge targets, you remember that you have parity.
Once you have memorised corners, you don the blindfold and solve them like normal. Once you’ve finished, although you can’t see the cube you know that the two edges either side of the buffer are swapped. If you do the Ra Permutation algorithm, what you are doing is swapping the two edges back to their original places, and the two corners that sandwich your edge buffer. See where this is going? Now, because the corners are flipped, you can perform your odd number of edge targets which will leave them solved once you’re done.
Questions?
This has been a fairly long tutorial on how to solve the Rubik's Cube blindfolded. If you think I’ve rushed something or need extra help with a particular step, please ask in the comments.
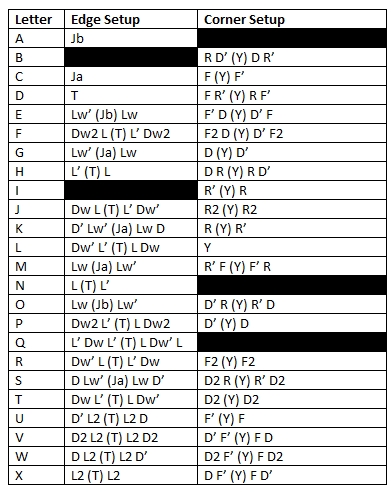
Setup Table
Below is a table which has the simplest setup moves for every target for corners and edges. Try to figure it out for yourself before using the table.
Blindfolded competition
a) Start the whole memo with A/E/R (UBL) twisted;
b) Start a new cycle by picking a twisted corner
You can come up with your own solutions and if you are doing it intuitively, start using structured algorithms so you always do the same and can improve on those (in terms of speed).
Good luck!
Als, after the scramble I can't find any orange sticker on top so I can't continue the tutorial for now.
I have a question. If almost every algorithm uses R moves, why the Jb permutation uses y2 (L moves) y2. It easy to see that you can cancel y2 turns and change L's for R's moves and viceversa. I think is easier to memorise (I don't know PLL alg's, perhaps there is and explanation) and it's clearer removing y2 turns..