Edges Only Void Cube
The Edges Only Void Cube is a modification of the popular Void Cube, which is in turn a modification of the standard 3x3. The puzzle was produced in 2009 by Cube4You, but the most popular brand for this puzzle is LanLan, with their version being released at the start of 2014. This cube, whilst unique in its appearance, is very similar to its predecessors, and thus the solution is fairly simply if you’re already familiar with how to solve a standard Rubik’s Cube.
Rotating the middle layer
What is the Void Cube?
A Void Cube is a modification of a normal Rubik’s Cube. Think of it as a hollow Rubik’s Cube. The mechanism of the two puzzles are very different, however. In a standard 3x3, the puzzle has fixed centres that are attached to a core, with all the edge and corner pieces moving around the centres. The Void Cube has a unique framework that all the pieces are attached to, so that the pieces can function just like a standard Rubik’s Cube, just without any centres.
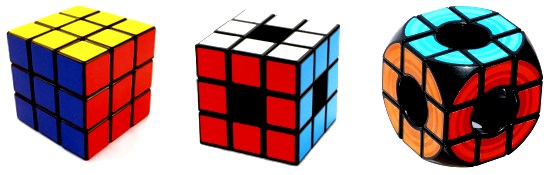
The left image shows a standard Rubik’s Cube, the second image shows an early design for the Void Cube. Rubik’s Brand have since released their own Void puzzle which has curved corners and neon coloured faces.
So how does the Edges Only Void Cube work?
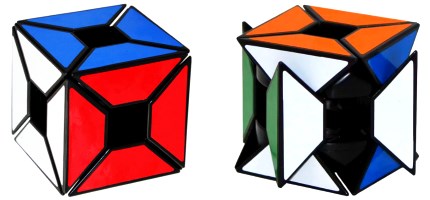
The Edges Only Void Cube is very similar in design to the standard Void Cube – The edges on each layer are extended into trapeziums which cover the positions where corners are on the standard Void Cube. It turns exactly the same as both a Rubik’s Cube and a Void Cube, it just has no corners.
Notation and Assumed Ability
For this tutorial, it will be assumed that you know the following things:
Solution of the Edges Only Cube
If you’re aware of the similarity between the standard Void Cube and the Rubik’s Cube, you probably won’t be surprised to hear that the Edges Only Void Cube is solved in the exact same way – Just like a 3x3, but with no corners.
The following are the steps involved in solving this puzzle:
- Solve the cross edges
- Solve the middle-layer edges
- Orient the last layer edges
- Permute the last layer edges
If you can already solve a Rubik’s Cube, then this should all be basic stuff. If you already know how to solve the Void Cube, remember that the Void Cube parity algorithm is not required here, just apply the same method to the puzzle and it should be solvable!
Cross Edges
The Cross edges are solved just like a standard Rubik’s Cube. This step will complete one face of the puzzle, as there are no corners that need to be solved on the first layer.
As with the Void Cube, you need to know the colour scheme of your puzzle for this section. If you’re using a puzzle with the same colour scheme as a 3x3 (white opposite yellow, green opposite blue, red opposite orange), then the cross edges need to be placed in the correct locations. The simplest way of doing this if you don’t know your colour scheme is to place red and orange edges opposite one another, then put green to the right of red and blue to the left of red (green and blue should now be opposite).
If you’ve done this stage incorrectly, it may make the puzzle unsolvable. If you don’t know the colour scheme and are struggling to learn it, just make sure that the red and orange cross edges are opposite one another (this also puts the green and blue opposite each other). As long as these two cross edges are opposite, the puzzle is solvable.
Middle-Layer Edges
In a standard 3x3 solve, you would now have to place the corners of the first layer. Here, there are no corners, so you can go straight into placing the middle layer edges. Also, because of the lack of corners, placing the edges is easier.
In a standard 3x3 solve and a Void Cube solve, you would have to preserve the corners by doing extra moves when inserting the edges. With this puzzle, you can simply insert a piece using R U’ R’ moves if you have a good knowledge of how your moves affect the pieces on the puzzle and don’t need to stick directly to the method (or, if it makes more sense to you, just solve the edges as though there were corners in those positions).
Once you’ve complete the middle layer edges, you only have to fix the last layer.
Orientation of Last Layer Edges (OLL)
This step is the same as the “Yellow Cross” step in the beginner’s Rubik’s Cube tutorial. If you follow that step, you should be able to get all of the yellow stickers on the top layer edges facing upwards.
Permutation of Last Layer Edges (PLL)
You should be able to solve the remainder of the puzzle by solving the yellow edges using the Beginner’s method to swap two edges at a time. On a standard Rubik’s Cube or a Void Cube, this would affect the corners on the top layer, but because there are no corners here you don’t need to worry about them.
Plenary
The entirety of this puzzle can be solved using simply Rubik’s Cube beginner method algorithms. Not all steps are required – You only have to do the following steps in the beginner’s method to solve the cube:
- 1 – White Cross
- 3 – Second Layer
- 4 – Yellow Cross
- 5 – Yellow Edges